Posted
Simplify the process of pivoting through data and expanding an investigation using Robtex
ThreatConnect developed the Playbooks capability to help analysts automate time consuming and repetitive tasks so they can focus on what is most important. And in many cases, to ensure the analysis process can occur consistently and in real time, without human intervention.
Robtex is a service which gathers public information about IP addresses, domain names, host names, Autonomous systems, and more. We developed these playbooks to perform one-click querying of Robtex to help easily expand a hunt/investigation. Both of these Playbooks simplify the process of pivoting through data and expanding an investigation (https://www.threatconnect.com/blog/how-to-pivoting-exporting-data-diamond-model/) which saves analysts time and makes their research more thorough.
Querying an ASN
When doing analysis or investigating a report of malicious activity on an Autonomous System, it is helpful to see what CIDR ranges are within that Autonomous System. This Playbook uses Robtex’s free API to find this information.
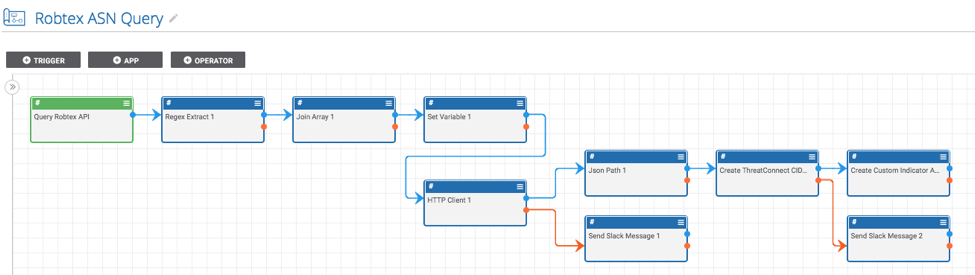
It is triggered with a User Action Trigger available on the page for all ASN Indicators. Once triggered, the Playbook submits the ASN to Robtex’s free API and creates a CIDR range Indicator for each of the CIDR ranges within that Autonomous System. It also associates each of the newly created CIDR ranges with the ASN.
To setup the Playbook:
- Download the “Robtex ASN Query.pbx” file from https://github.com/ThreatConnect-Inc/threatconnect-playbooks/tree/master/playbooks/robtex-query
- Import the Playbook into ThreatConnect. You can do this by going to the “Playbooks” tab in ThreatConnect and clicking “New” > “Import” (on ThreatConnect versions before 5.7, you can click the “Import” button). Then import the Robtex ASN Query.pbx file.
- Now that the Playbook is imported, double check the variables defined in the “Set Variable 1” app by double-clicking on that app. You will want to update the “slackChannel” variable which will be used by slack apps later in the Playbook.
- Next, find the two apps to send slack messages (“Send Slack Message 1” and “Send Slack Message 2”) and provide the missing slack API token. If you don’t have slack, no problem! You can replace the slack apps with another app of your choice (maybe send an email or create a notification in ThreatConnect).
- Last, edit the “Create ThreatConnect CIDR 1” and provide the name of the owner in which you would like the CIDR range Indicators to be created. Once this is done, turn it on and run the Playbook!
Querying an IP Address
When investigating a malicious IP Address, it is helpful to see what Hosts have resolved to that IP Address. This Playbook allows incident responders, analysts, and threat hunters to query Robtex’s free API to identify Host Indicators which are resolving or have resolved to the given IP Address in the past.
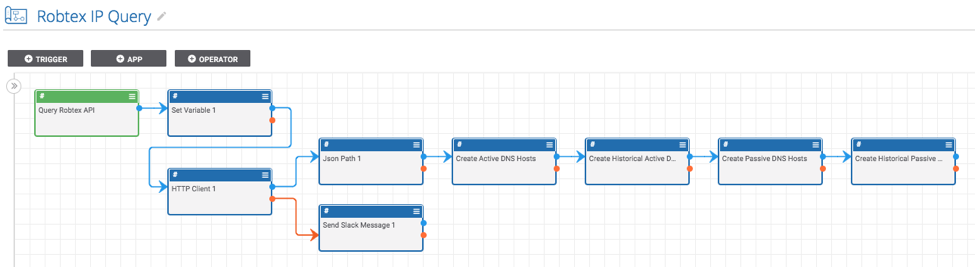
This Playbook simplifies the process of pivoting from an IP address and expanding an investigation.It is triggered with a User Action Trigger available on the page for all IP Address Indicators. Once triggered, the Playbook submits the IP Address to Robtex’s free API and creates a Host Indicator for each of the Hosts that Robtex has listed as a DNS resolution for this IP address.
To setup the Playbook:
- Download the “Robtex IP Query.pbx” file from https://github.com/ThreatConnect-Inc/threatconnect-playbooks/tree/master/playbooks/robtex-query
- Import the Playbook into ThreatConnect. You can do this by going to the “Playbooks” tab in ThreatConnect and clicking “New” > “Import” (on ThreatConnect versions before 5.7, you can click the “Import” button). Then import the Robtex IP Query.pbx file.
- Now that the Playbook is imported, double check the variables defined in the “Set Variable 1” app by double-clicking on that app. You will want to update the “slackChannel” variable which will be used by slack apps later in the Playbook. If you don’t have slack, no problem! You can replace the slack apps with another app of your choice (maybe send an email or create a notification in ThreatConnect).
- Next, edit all of the apps to create the Host Indicators (“Create Active DNS Hosts”, “Create Historical Active DNS Hosts”, “Create Passive DNS Hosts”, and “Create Historical Passive DNS Hosts”) and provide the name of the owner in which you would like the Host Indicators to be created.
- Finally, find the “Send Slack Message 1” app and provide the missing slack API token.
Don’t forget that you can easily modify either of these Playbooks to fit your use case. Don’t want to automatically create the Hosts as Indicators? No problem; just record them in an attribute on the IP address.
If you have any questions or run into any problems with either of these Playbooks, please raise an issue in Github.
