Posted
With these Playbooks, create the sharing and connection between two otherwise segmented products
These two Playbooks allow you to orchestrate the ability to retrieve files deemed malicious by Palo Alto Wildfire and submit them to VMRay for a full malware analysis. They bridge the gap between two malware analysis products, as well as create actionable threat intelligence in both the Palo Alto Wildfire Playbook, as well as hooking into other VMray Playbooks.
These Playbooks create the sharing and connection between two otherwise segmented products. The first Playbook runs on a timer, downloading the Wildfire Threat logs which then uses the hashes provided to actively query Wildfire for the malicious files, while the second Playbook automatically triggers when those files are stored as malware in the vault within a Wildfire source.
The Playbooks:
- are fully automated
- free SOC personnel from manually reviewing files in Palo Alto Wildfire
- can be used in conjunction with separate VMRay Playbooks that pull all the analysis results down into the Platform as actionable threat intelligence
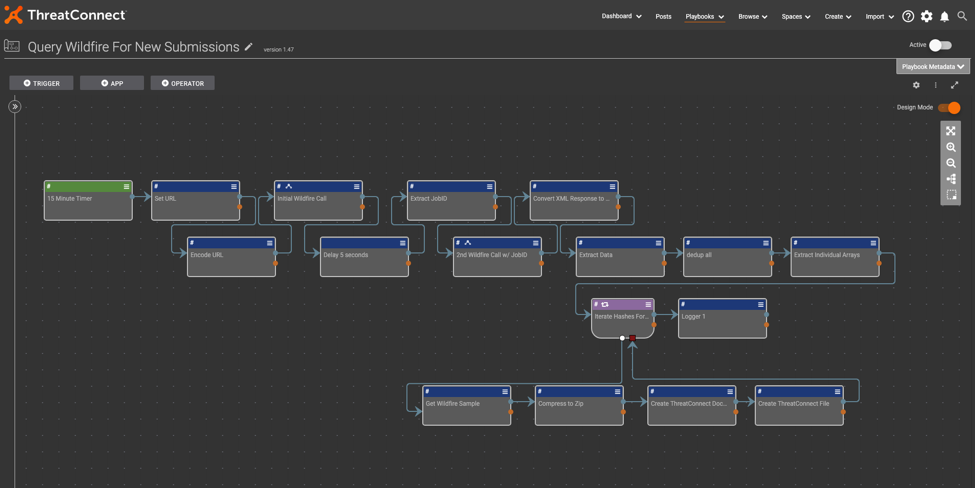
How to Set up Playbook 1: Query Wildfire For New Submissions
Initial Wildfire Call: This HTTP client is used to submit the first request to the Wildfire API, specifically to GET Wildfire logs that are malicious – this is achieved by using the Wildfire query language to specify the verdict, as well as the time frame for this log pull. In this case, (verdict neq benign) and (receive_time in last-15-minutes) is used. Set all of these as query parameters in the HTTP client.
Delay 5 seconds: Since Wildfire queues up a job to collect these logs, delay for a short amount of time, as immediately making a second request could result in an empty response if that job didn’t complete.
Extract JobID: This step is simply using a regular expression to extract the JobID from the initial API response.
Second Wildfire Call w/ JobID: This is essentially the same request made to the API as the initial request, but in this instance you are defining the JobID in the query parameters to specifically pull back the logs that you just requested.
Convert JSON <> XML: This is completely optional – in case you prefer working with JSON formatted data rather than XML.
Extract Data: This is utilizing JMESPath to extract the specific data that is relevant to the use case from the returned logs. The JMESPath expression specifically here is response.*.*.*.*[][][][].{filedigest: filedigest, subject: subject, misc: misc}.
Deduplicate all: This is an array operations app that has many different functions to it – in this instance you can use the Unique operation to deduplicate data from what you just extracted in the previous JMESPath step.
Extract Individual Arrays: One more JMESPath pass to get the data perfect. You can use a pretty simple expression to pull the file digest, subject, and misc fields out of the JSON for later use.
Iterate Hashes For Binaries: From the Wildfire logs, pass the following through to iterate on: file hash values, document names, and file names. The rest of the Playbook is contained within the iterator and will execute one pass per file hash value.
Get Wildfire Sample: This is a prebuilt Playbook application that handles all the Wildfire API calls for the end user. Simply supplying the API key and the hash value to retrieve is all that is needed.
Compress File: Compress the malware sample via a password protected zip file to store in the malware vault.
Create ThreatConnect Document: This is the standard document creation Playbook application – you are simply passing through the relevant data into each field and letting the ThreatConnect API take care of the rest.
Create ThreatConnect File: Similarly to creating the document, this just involves the extra step of associating this hash indicator with the document itself.
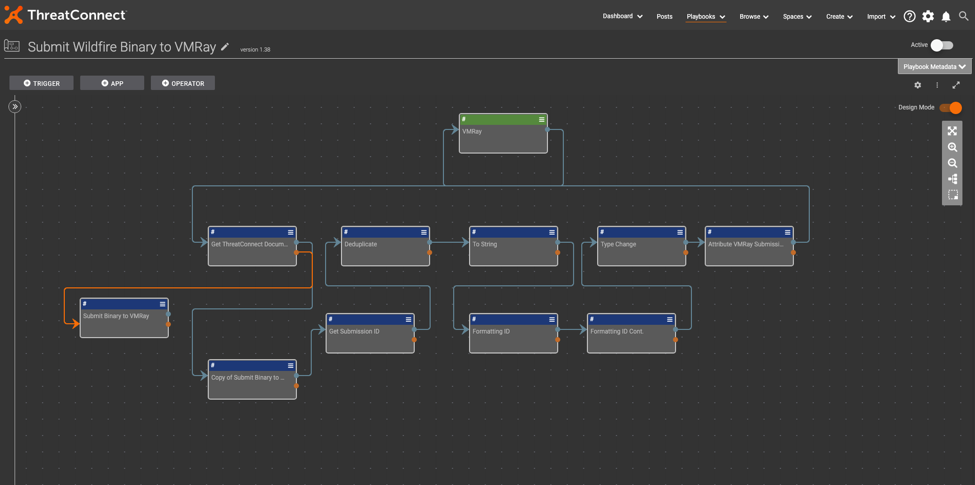
How to Set up Playbook 2: Submit Wildfire Binary to VMRay
This Playbook automatically triggers when the documents from the prior Playbook get created within their respective Wildfire source in ThreatConnect.
Get ThreatConnect Document by ID: This step is simply grabbing the document from the trigger.
Submit Binary to VMRay: Use VMRay’s API to submit the malware sample using the sample_file key. Refer to VMRay’s API documentation for more granular options when submitting files for analysis.
Get Submission ID: In this JMESPath application, you can use the data.jobs[].job_submission_id expression to extract the submission ID.
Deduplicate: This is another array operations application, also using the unique operation to deduplicate if any exist.
To String: The logger application is a great way to convert an array into a string output if a string type is required in subsequent steps.
Formatting ID/Formatting ID Cont.: Use find and replace to remove the brackets around the original submission ID value to make it cleaner.
Attribute VMRay Submission ID to Document: This step is memorializing the submission ID in the VMRay Submission ID attribute within the original document that triggered the playbook execution.
If you have any questions or feedback, feel free to raise an issue. Also, don’t forget to explore our repository of Playbooks, Playbook Components, and Playbook Apps.