Posted
As promised, below is how to customize this app to change the disclaimer, and contact information. However, I encourage you to stick around as I dig in for a deeper dive, explaining in detail all of the code within this app. With that said, let’s go!
Replace everything after the = on Lines 32-34 and Lines 36-40 so that instead of this:

It looks like this:
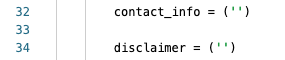
Add in your text for each in between the ‘ ‘ for each of the variables:

Then click the Released button and your changes will be made and live – so long as you choose a patch or minor release. Otherwise, if you do a new major release existing playbooks using the older version will not automatically update.
The remainder of this post is a line by line breakdown, detailing how the app operates. If you missed Part 1, check it out first before moving on.
Imports:
Let’s begin by looking at lines 3-8, these are our import statements that tells the Python interpreter “these are all of the libraries that we need for our code”.

The libraries json, base64 and re are built in libraries from Python.
The json library is used to encode/decode JSON to/from python objects that are of the type dictionary.
The re library is used for parsing regex, in this code we are using it to find and replace characters.
The base64 library is used to encode/decode objects, in this code we base64 encode the associated screenshots to embed them into the report.
The jmespath library is used to filter the JSON responses from the API queries.
The ioc_fanger library is used to de-fang indicators that are retrieved. Special shoutout to Floyd Highertower for this awesomeness!
The jinja2 library is used for the HTML templating engine.
Setting initial variables:
This block of code focuses on setting initial variables needed for the remainder of the code.
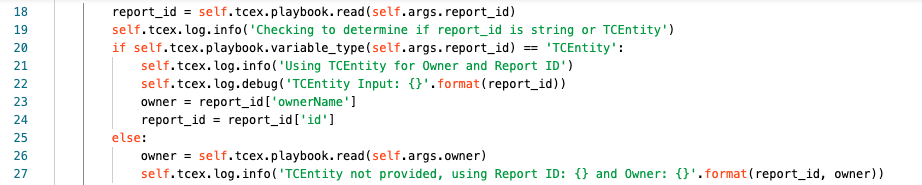
Line 18 we are getting the user’s input for what they have specified for report_id. This field is special as it will accept one of two different inputs. Either a string (report id) OR an TCEntity.
Line 19 we are logging at the info level what the playbook is performing at that particular step.
Line 20 we are check which object type report_id is. If it is an TCEntity it will be True. If it is not, the only other option is a string.
Line 21 at the info level, in the logs it will show that we are using the TCEntity, therefore the Owner selected is ignored.
Line 22 at the debug level, we are logging the contents of the item that was configured for the report_id’s input.
Line 23 we are re-assigning the owner input to be the owner specified from the TCEntity (the python JSON library is used here).
Line 24 we are re-assigning report_id to be the id from the TCEntity that was specified (the python JSON library is used here as well).
Line 25 should the item entered via the UI be a String meaning the result from Line 20 is False, Lines 21-24 are skipped.
Line 26 we are seeing the owner variable to what the user has specified in the UI.
Line 27 we are logging at the info level that a TCEntity was not used, and simply log the supplied report_id and owner.
Note:
- Playbooks have several different run-levels offered for logging. With ERROR being the least amount of information, two steps above that is INFO and DEBUG/TRACE having the most verbose output possible.With TCEX debug is equal to TRACE within Playbooks. One convention that you will see repeatedly throughout this walkthrough are what looks like two duplicates for logging, however I’ve tried my best to balance the two. With info simply returning where the execution is at with a particular step, and with debug giving back everything that I can to assist the playbook designer and/or app developer in troubleshooting any issues should they arise during execution.
- If a TCEntity is used and Line 20 evaluates to True, the Lines 25-27 are ignored.
- If a TCEntity is not used and Line 20 evaluates to False, Lines 21-24 are ignored.
- Line 22 makes use of String Formatting within Python to insert where you see {} with the value to the right. So for example, if the report ID provided was “1234” then the log would show: TCEntity Input: 1234
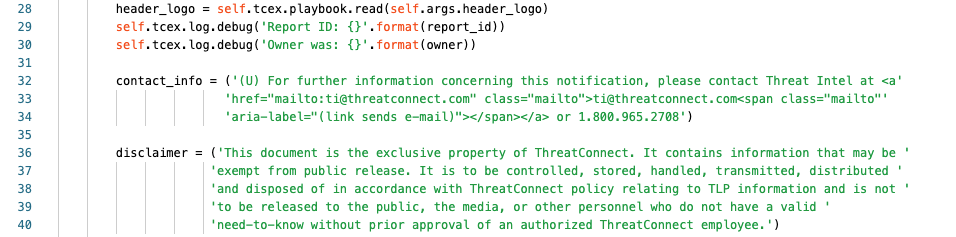
Line 28 we are reading in the URL supplied by the user for the header logo when the report is printed.
Lines 29/30 we are logging at the debug level what the Report ID and Owner being used is.
Lines 32-34 we are assigning contact_info to the string contained to the right.
Lines 36-40 we are assigning disclaimer to the string contained to the right.
Note:
- The ‘ over the far right for contact_info and disclaimer are to break up the text so that it is PEP8 compliant but is not 100% required. You could write the entire string without those and it will function correctly. However, it is best practice to not exceed 80 characters in width to be compliant with PEP-8.
Custom Functions:
This block of code focuses on creating two internal functions used by the app.
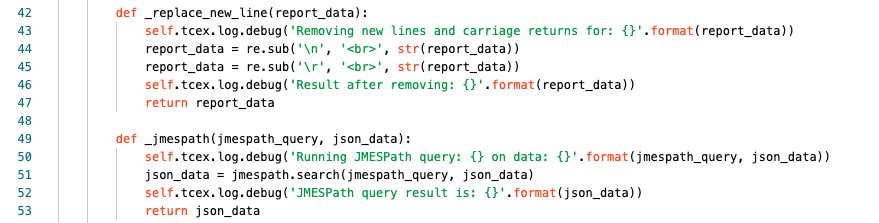
Lines 42-47 make up our function for replacing new lines with HTML line breaks.
Line 42 we are declaring the name (_replace_new_line) and the input that we are assigning to a name to be used within our function (report_data).
Line 43 are logging at the debug level, what action we are performing and the input data.
Lines 44/45 we are searching for a new line or carriage return using regex (re library) and are replacing it with <br>.
Line 46 at the debug level, are logging what the output result is after formatting
Line 47 we are returning the result of the regex and exit the function
Lines 49-53 make up our function for using JMESPath to parse the JSON that is passed into it.
Line 49 we are declaring the name (_jmespath) for our function and are assigning the name to be used for the two inputs (jmespath_query and json_data).
Line 50 we are logging at the debug level both the query and the full dataset that was passed in.
Line 51 we are assigning json_data the result of the jmespath query.
Line 52 we are logging at the debug level what the results of the JMESPath query where.
Line 53 we return the result of the jmespath query and exit the function.
Note:
- I’ve prefixed my functions with _ to denote that this is intended for internal use only and is by convention only. Meaning that if someone where to take this app.py and reference it somewhere else, it may not work as they have intended for their code.
Getting Attributes:
This block of code focuses on getting the attributes and reformatting them with an JMESPath query to convert them into a dictionary.
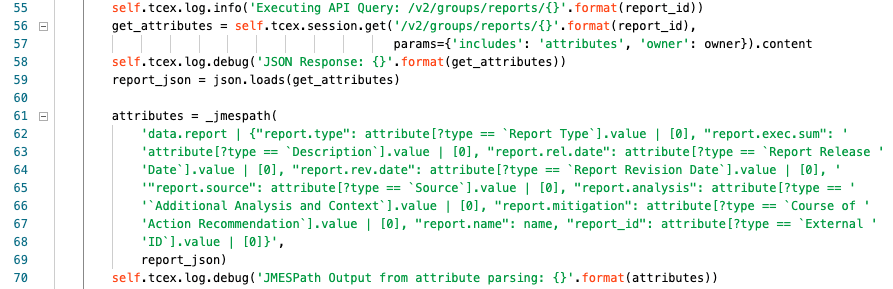
Line 55 we are logging at the info level the API query that we are about to perform.
Lines 56/57 we are assigning get_attributes to the JSON response returned from the API and are passing in several variables.
Line 58 we are logging at the debug level, the response from the API query.
Line 59 we are assigning report_json to the result of a json.loads version of the get_attributes response.
Lines 61-69 we are assigning attributes to the result of our JMESPath query that is ran against report_json’s contents.
Line 70 we are logging at the debug level the result of the JMESPath query.
Note:
- Line 59 using json.loads we are converting the object from JSON to a Python dictionary.
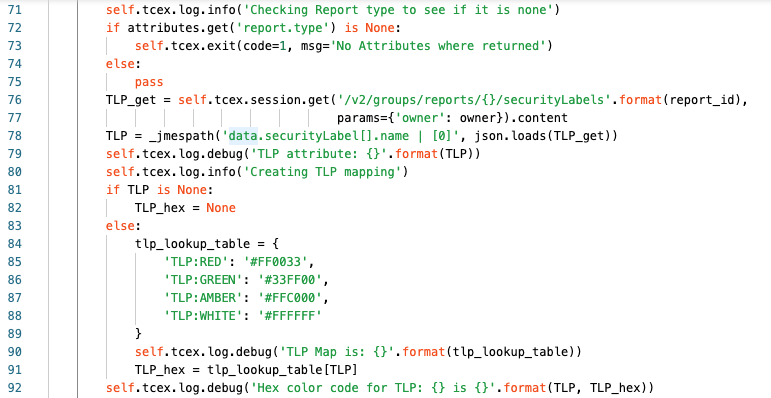
Line 71 we are logging at the info level the action that we are about to do (checking if the report type was missing).
Line 72 we are checking if the attribute is equal to None (empty or missing or not null).
Line 73 will only be executed if the result from Line 72 is True, in which case the Playbook app will terminate.
Line 74/75 otherwise if the result from Line 72 is False, meaning it exists, then we will exit the if and continue to Line 76
Lines 76/77 we are assigning TLP_get to the API query to get the TLP label that is applied to the report.
Line 78 we are assigning TLP to the JMESPath result for the specified JMESPath query to extract out the specific TLP applied, ex: TLP:RED
Line 79 at the debug level we are logging the result of the TLP Attribute from the JMESPath query.
Line 80 we are logging at the info level that we are creating the TLP mapping.
Lines 81/82 we are checking to see if the TLP exists from the report. If it does not, then we are setting the TLP_hex value to None as well. If this is True, lines 82-91 are skipped.
Lines 83-91 are executed if the TLP is not None, or null/empty.
Lines 84-89 are creating a dictionary in Python to map a specific TLP to an HTML hex value.
Line 90 we are logging at the debug level what the tlp_lookup_result looks like.
Line 91 we are assigning TLP_hex to the value of what it equals from the tlp_lookup_table
Line 92 we are logging at the debug level what the TLP returned as well as the TLP_hex is.
Getting Associated Indicators:
This block of code gets all of the associated indicators and then if any are returned – defangs them for the report.
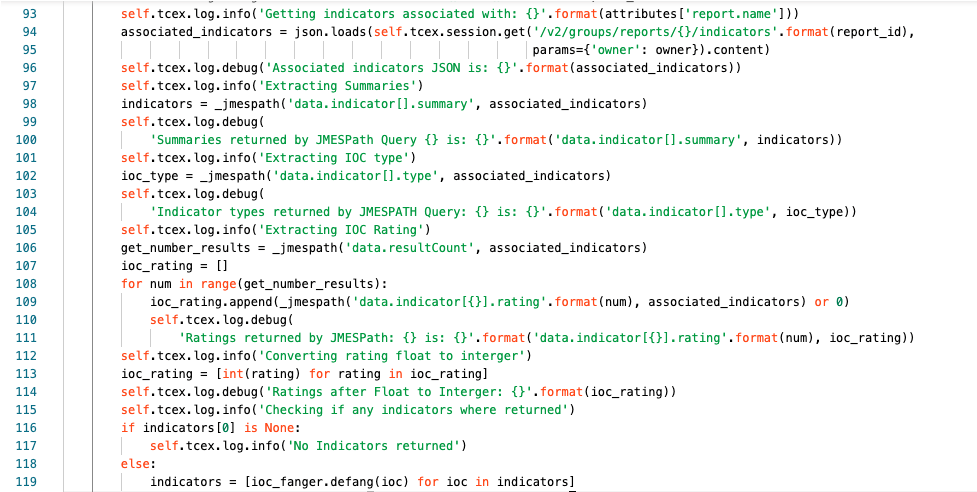
Line 93 we are logging at the info level the action we are about to perform. In this case that we are getting indicators associated with the report name.
Lines 94/95 we are assigning associated_indicators with the result of the API query that we are performing.
Line 96 we are logging at the debug level the response that we received.
Line 97 we are logging at the info level that we are going to extract the summaries (name of each indicator)
Line 98 we are assigning the variables indicators to the JMESPath query to extract the names.
Lines 99/100 we are logging at the debug level, the JMESPath query and the result of the extraction.
Line 101 we are logging at the info level, that we are extracting the indicator type.
Line 102 we are assigning ioc_type to the result of the JMESPath query to extract the indicator types.
Lines 103/104 we are logging at the debug level the JMESPath query and the types returned.
Line 105 we are logging at the info level that we are Extracting the indicator rating
Line 106 we are assigning get_number_results to the JMESPath query to get the item from the JSON response.
Line 107 we are creating an ioc_rating list.
Lines 108-111 we are populating the ioc_rating list
Line 108 we are stating for each item in the number of results do what is contained in lines 109-111
Line 109 we are appending to the list, a JMESPath query to get the result of indicator rating OR if the rating was null assigning it to 0 for each item.
Lines 110/111 we are logging at the debug level the JMESPath query and result.
Line 112 we are logging at the info level the action we are about to do, in this case, converting a float to an integer.
Line 113 we are using list comprehension to convert all floats to integer.
Line 114 we are logging at the debug level the ratings after conversion.
Line 115 We are logging at the info level that we are checking if any indicators where returned.
Line 116 We are checking if the first item in the array indicator[0] array is None
Line 117 if the result from line 116 is True, then we log at the info level that no indicators where returned.
Line 118 If the result from line 116 is False
Line 119 we are updating the indicators array and using list comprehension are converting are using the ioc_fanger library to defang each indicator.
Note:
- The API returns the ratings as a float (number with a decimal) and we need it to be an integer (whole number).
Please see this for list comprehension: https://docs.python.org/3/tutorial/datastructures.html#list-comprehensions
Formatting Attributes:
This block of code uses the above internal function created to remove any r or n characters for HTML representation.

Lines 120-123 are using the custom function and is replacing any line that has r (carriage return) or n (new line) to HTML formatted with <BR> to make them spacing recognized by HTML for the templating engine (jinja2).
Getting Associated Documents:
This block of code gets the associated documents (screenshots) and converts them into Base64 to add them to the finalized report.
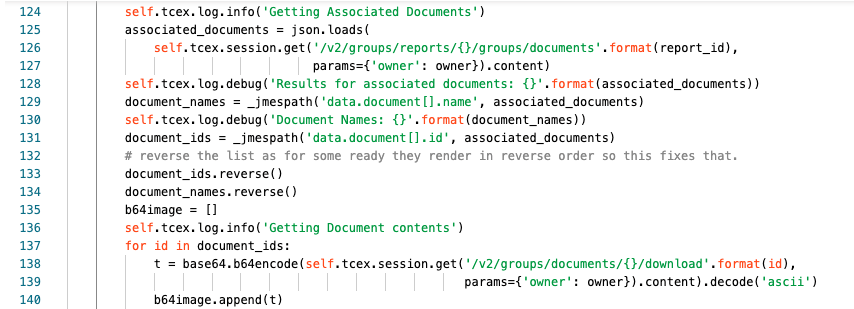
Line 124 we are logging at the info level that we are getting associated documents.
Lines 125-127 we are assigning to the associated_documents variable the results of the API query.
Line 128 at the debug level, we are returning JSON result for the query.
Line 129 we are assigning document_names to the JMESPath query to extract the document names.
Line 130 at the debug level we are logging the document names returned in step 129.
Line 131 we are assigning the document_ids variable to the JMESPath query to get the document ids.
Line 132 an internal comment
Line 133 we are reversing the document_ids list (see comment on line 132).
Line 134 we are reversing the document contents (see comment on line 132).
Line 135 we are creating an empty list called “b64image”.
Line 136 we are logging at the info level that we are getting document contents
Line 137 we are iterating over each ID in the document_ids list.
Lines 138-139 we are assigning the temporary variable “t” to the base64 encoded result of the API query that returns a binary document type that is then base64 encoded.
Line 140 for each of those base64 encoded items from lines 138/139 we are adding the b64image list.
Filling in the template:
This block of code gets the template and begins to populate the template.
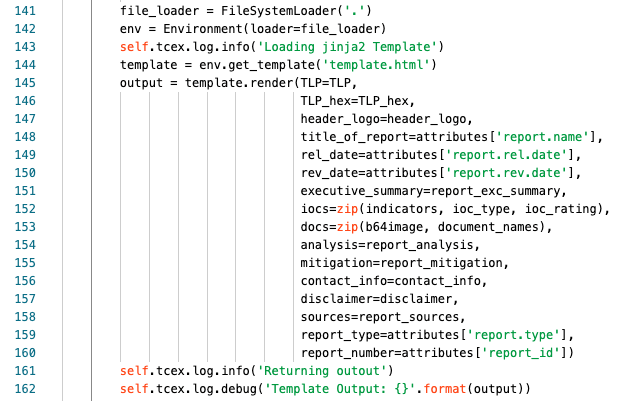
Line 141 we are creating a variable file_loader to get items in the current directory
Line 142 we are creating an env variable to hold the localized Environment for jinja2.
Line 143 we are logging at the info level that we are loading the template.
Line 144 we are assigning the template variable to the actual file to use.
Line 145 we are assigning the variable output to functions from the jinja2 library. We are also loading in the TLP variable for the template.
Lines 136-160 we are assigning the inputs for the items in the template. See the Other Notes of interest, template below. For lines 152/153 please see the Other Notes of interest, ZIP below.
Line 161 we are logging at the info level that the template rendering is complete.
Line 162 we are logging at the debug level the actual contents of the rendering.
Notes:
Please see here for what zip in the above means: https://docs.python.org/3.3/library/functions.html#zip
Returning the result:
This block of code returns the output from the code.
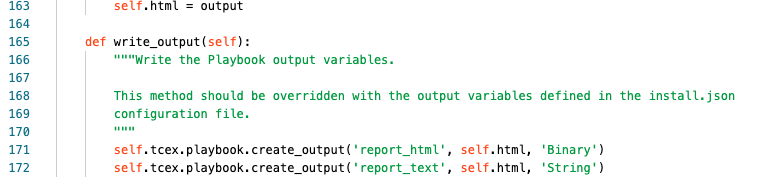
Line 163 we are creating the variable self.html and assigning it to output.
Line 171 we are writing the output for self.html as a Binary as the name report_html
Line 172 we are writing the output for self.html as a Binary as the name report_text
Note:
- Since our code is inside of a function (def run(self)) in order for us to use it outside of the function we have to prepend self.
- For my outputs, they are referencing the same variable but I am changing the type. This is for interoperability and allowing the playbook to solve or be used for multiple use-cases.
Other notes of interest:
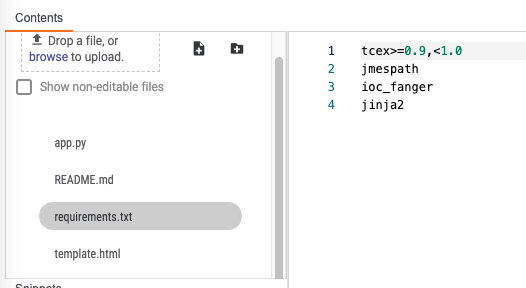
requirements.txt:
Here is the requirements.txt file. When the app is built, pip will install these to the lib_XXX folder correlating to the version of Python that you have installed. For example, Python 3.6.3 would produce a folder, lib_3.6.3 with these libraries downloaded into it.
Template
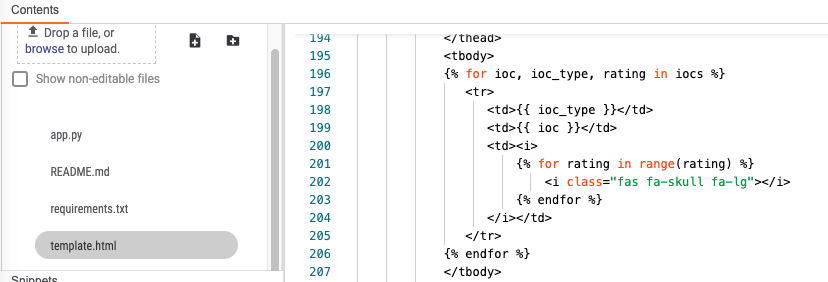
Within app builder you will notice the template.html. The variables on lines 145-160 on the left hand side of the operator refer to items in the template. Ex:
{{ TLP }} or {{ TLP_hex }}.

ZIP:
For the items on Lines 152 and 153:
iocs=zip(indicators, ioc_type, ioc_rating),
docs=zip(b64image, document_names),
As we are performing a zip operation we need to iterate over them. Note the example below for the indicator inputs. This is slightly complicated to explain but I encourage you to read Python’s zip documentation, but essentially I am combining 2 lists into tuples so that I can iterate over these in parallel.
As an example given the two lists below:
list1 = [“item1”, “item2”, “item3”]
list2 = [“item4”, “item5”, “item6”]
After a zip operation:
combined = zip(list1, list2)
This will be this will be a list of 3 tuples:
[ (“item1”, “item4”), (“item2”, “item5”), (“item3”, “item6”) ].
So that an iteration can be performed in parallel over the objects so we could do something like:
for thing1, thing2 in combined:
print(‘First item: {}, Second item: {}’.format(thing1, thing2))
Would print out:
First item: item1, Second item: item4
First item: item2, Second item: item5
First item: item3, Second item: item6
Logging:
When logging actions, it’s important to have a fine balance between the various levels. Bearing in mind that the default “info” should not be very verbose and should simply log the steps being performed. Whereas “debug” should give back the most (and relevant) information for troubleshooting purposes to help someone either debug their input or assist the app developer in troubleshooting an error in their logic.