Posted
For all of the other applications that ThreatConnect does not have an integration for, API is the best way to go. With the repeating of calling IOC data, the use of the Component allows you to have all of that data in a format to map it as needed
The reason for the PlayBook came from working so much in API calls with other applications. For all of the other applications that ThreatConnect does not have an integration for, API is the best way to go to get communication working in a structured manner. With the repeating of calling IOC data, the use of the Component allows you to have all of that data in a format to map it as needed or even allow data updates to happen in fewer steps than it would take to do by hand. (Side note: It’s actually beneficial to name Components with “Component” in the name for the simplicity of sorting your exported PlayBooks/Components in an organized manner.) With the data always being in the same format, you are able to generalize your PlayBook actions to work off the data structure rather than attempting to pull the data (it might not exist).
With this Playbook:
- Data is formatted to JSON
- All data is more parseable, and
- All API data is collected in one step
The use of the Component helps to eliminate the need for additional steps to capture the data. Regardless of the data’s existence, the JSON structure will always be present. With that structure there all the time, the parsing of the data can always call on the section. If there is no data, the parse will still happen and succeed, it just will not be anything that a future step will need to work.
When working with API calls and the return of the data, you then need to parse and map the data to variables. Depending on the data that is to be sent, different items may need to be collected for different applications. With a one-stop of all the IOC data that can be obtained by the API, you simplify the need to set up specific calls. With all of the data in one JSON, you lessen the number of parsing steps needed, as all the parsing can be done at one time against the combined JSON.
Because this is a Component, it is built to be put in a PlayBook to simplify the data calls needed. The Component Trigger accepts a String for the incoming Indicator. The output from the Trigger is the JSON structure of all the data that was collected on the Indicator that was fed in at the beginning.
The PlayBook starts by calling the ThreatConnect API to check for the IOC in question. If the IOC exists, then an initial call of the IOC data via API will be done. At the same time, an API call is being done to capture the available IOC types for the Platform. The API Branch for the IOC is parsed out of the results where it is compared to the IOC Type from the initial IOC API call. The next two steps are to clean up the data from the parse to ensure it is accurate for the future API calls.
Now with some of the IOCs, special characters exist in their summaries. In order to use them in an API call, the special characters must be percent-encoded. The three steps after the API branch variable cleanup are to take the IOC and encode it in a manner that can be used by the API. Once the IOC is encoded, there are a set of steps that are branched out. Each branch tackles a certain API call that is specific in nature where the data is not able to be collected from the main call. Once the specific data calls are done, the data is parsed from each call to help with future formatting. All parsed data is pushed into a Logger app along with the data from the main API call. You can use Logger to create the JSON structure and reference the parsed data to provide the same framework. Now if the IOC in question does not exist, a separate path runs where a variable is set to 0 (zero). This app and the Logger app join together at the Merge in the Component. Depending on which app has data, it will be converted into a new variable. That variable is passed back to the Component Trigger to be used as the output back into the PlayBook it is in.
Here’s how it works:
Step 1 – Component Trigger Input
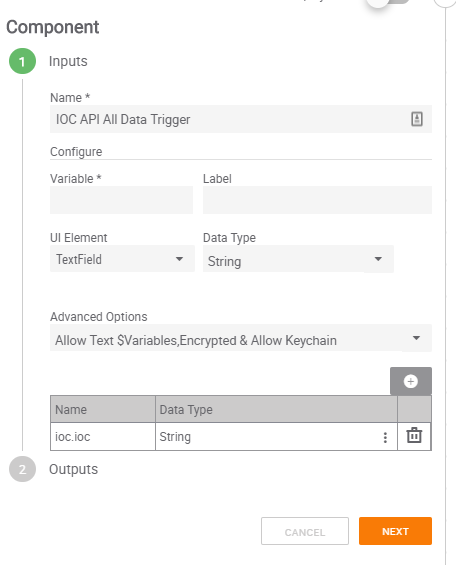
First, start by defining the input you want the Component to ingest and declaring the variable name. I chose to do String only as we just want the name of the IOC to come into the Component. If you choose others, you would need to include additional parsing to capture just the IOC name. I set the option to include $Text Variables and made it a Requirement to ensure that some sort of data is fed into the Component. We will skip on the Output section of the Trigger until we have the parts needed setup.
Step 2 – Main API Call of IOC
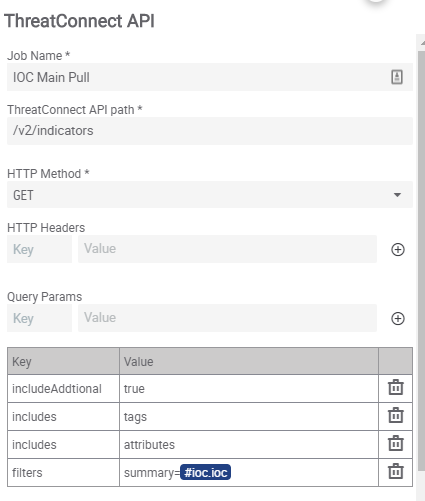
With the variable set from the input, we now call on the ThreatConnect API app. Since we plan to allow this API call to be any IOC type, we will use the API path of /v2/indicators only and set the HTTP Method to GET. We set in the query parameters to includeAddtional to true, includes to tags, includes to attributes, and filters to summary=#variable-name. The #variable-name comes from Component input.
Step 3 – Results Count !=0
To ensure that the future steps only happen if the IOC exists in the Sources the Run As User has access to, we use an IF/Else operator to run a check. The #tc.api.count is referenced from the Main API Call app from before. If that count does not equal 0, then we will want to proceed with the additional steps to collect the data.
Step 4 – Set Result to 0
For the False/Failed connection on Step 3, we will connect the Set Variable app to it. Create a new variable and set the value to 0.
Step 5A – Parse API Results
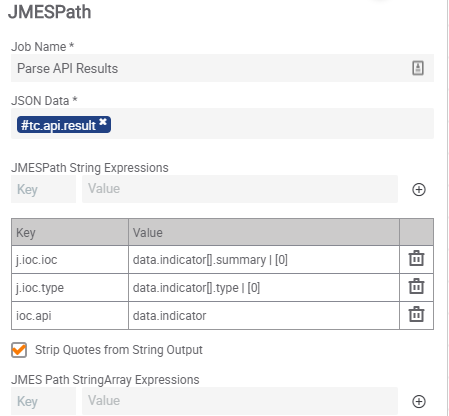
From the True/Success connection on Step 3, we will connect the JMESPath app to it. The app will reference the #tc.api.result output variable from Step 2 to parse against. We will set up three String Expressions to parse out the data needed in the future. The first String will have a value of data.indicator[].summary | [0] . This will capture the IOC name again, but for some IOC types, there is a variation on how it is stored from the API. The second String will have a value of data.indicator[].type | [0] . This will capture the IOC type from the results that we will use to leverage the API branch. The third String will have a value of data.indicator . This is a parsing of the JSON data to the extent of the IOC information itself. This will be used to build the new JSON later.
Step 5B – API for IOC Types
Off the same True/Success connection that Step 5A uses, we will connect the ThreatConnect API app to run a query at the same time. The API path for the app to run is /v2/types/indicatorTypes . We will use GET as our Method and no other options needed. This will capture all IOC types in the platform along with the related data.
Step 6 – Pull API Branch Based on IOC Type
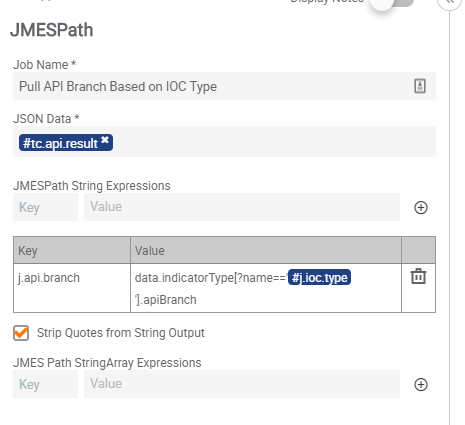
Both Step5a and Step 5B success connections tie into a JMESPath app. The JSON Data input for the app will come from the #.tc.api.result output variable from Step5B. We will make a single String Expression to map the branch needed to the IOC. The value to make that mapping is data.indicatorType[?name==’#j.ioc.type ‘].apiBranch . The #j.ioc.type is the second String mapping we made in Step5A. This value will search the IOC Types API call we did and list the apiBranch that matches to the name of the IOC type of the IOC brought into the Component. This parse will ensure that the apiBranch called will always match back to the IOC running to allow Custom IOCs to be used in this Component.
Step 7 – Drop Brackets from Branch
With the capturing of the correct apiBranch from JMESPath, we connect to a Find and Replace app. The input from the app will be the variable setup in Step 6 that parsed the apiBranch. We use ([|]) as our Find and leave the Replace field empty. We check the Regex box as our query is Regex. The query will look for [ or ] and delete them from the string.
Step 8 – Drop Quotes from Branch
We connect another Find and Replace app to the success of Step 7. This step will take the output variable from the previous Step as the input text. Our Find field will just be a double quote, and Replace will again be empty. This will strip the quotes from the String to ensure they do not interfere in the future API calls.
Step 9 – Change \ to in IOC
With the way the data on the IOC is stored from the API perspective, any in the summary name of the IOC gets an additional added to act as the escape character for the String. We will take another Find and Replace app and connect it from the success in Step 8. This Find and Replace will leverage the IOC variable that we created in Step5A as the input text. The Find field will be two backslashes and the Replace field will be a single backslash. The Find and Replace will only make changes if the Find query does exist, so the majority of the IOCs may skip this step.
Step 10 – Encode IOC String for API
We will take a String Operations app and connect it to the success of Step 9 for our next step. We’ll use the URL Encode Operation to encode any special characters in the output variable from Step 9. The Strings field will be that output variable to make those changes.
Step 11 – Replace / for Encoding IOC
Just like in Step 9, we will use Find and Replace to help adjust the IOC variable. Take another Find and Replace app, and connect it to the success of Step 10. The input for the app will be the output variable #string.outputs.0 from Step 10. This variable is specified as a String and we will want to keep the variable that way. Our Find field will be the forward slash and the Replace field will be %2F . The encoding in Step 10 does not cover down on this character, so this step will ensure that we cover down in case that character exists in the IOC name.
Step 12A – Victim Associations Pull
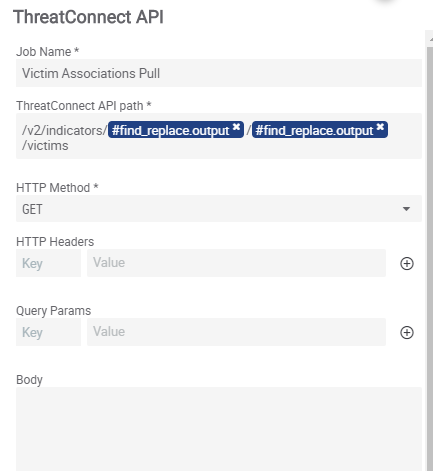
From the success of Step 11, we branch 5 other apps to run concurrently from each other. For 12A, the app is the ThreatConnect API app so that we can pull the potential Victims that may be related to the IOC. Our API path will be: /v2/indicators/#find.replace.output/find.replace.output/victims . The first find.replace.output is the output variable from Step 8 and the second find.replace.output is the output variable from Step 11. We will set the HTTP Method to GET.
Step 12B – Victim Assets Associations Pull
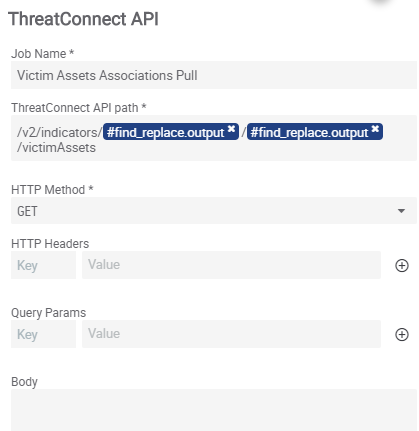
From the success of Step 11, we branch 5 other apps to run concurrently from each other. For 12B, the app is the ThreatConnect API app so that we can pull the potential Victims that may be related to the IOC. Our API path will be: /v2/indicators/#find.replace.output/find.replace.output/victimAssets . The first find.replace.output is the output variable from Step 8 and the second find.replace.output is the output variable from Step 11. We will set the HTTP Method to GET.
Step 12C – Security Labels Pull
From the success of Step 11, we branch 5 other apps to run concurrently from each other. For 12C, the app is the ThreatConnect API app so that we can pull the potential Victims that may be related to the IOC. Our API path will be: /v2/indicators/#find.replace.output/find.replace.output/securityLabels . The first find.replace.output is the output variable from Step 8 and the second find.replace.output is the output variable from Step 11. We will set the HTTP Method to GET.
Step 12D – Group Associations Pull
From the success of Step 11, we branch 5 other apps to run concurrently from each other. For 12D, the app is the ThreatConnect API app so that we can pull the potential Victims that may be related to the IOC. Our API path will be: /v2/indicators/#find.replace.output/find.replace.output/groups . The first find.replace.output is the output variable from Step 8 and the second find.replace.output is the output variable from Step 11. We will set the HTTP Method to GET.
Step 12E – IOC to IOC Associations Pull
From the success of Step 11, we branch 5 other apps to run concurrently from each other. For 12E, the app is the ThreatConnect API app so that we can pull the potential Victims that may be related to the IOC. Our API path will be: /v2/indicators/#find.replace.output/find.replace.output/indicators . The first find.replace.output is the output variable from Step 8 and the second find.replace.output is the output variable from Step 11. We will set the HTTP Method to GET.
Step 13A – Victim API Data Parse
From the success of Step 12A, we connect the JMESPath app to it. Our JSON data field will be the #tc.api.result output variable from Step 12A. We will create one String expression with the value set to data.victim. This will help to clean up the data for the future JSON.
Step 13B – Victim Assets API Data Parse
From the success of Step 12B, we connect the JMESPath app to it. Our JSON data field will be the #tc.api.result output variable from Step 12B. We will create one String expression with the value set to data.victimAsset. This will help to clean up the data for the future JSON.
Step 13C – Security Labels API Data Parse
From the success of Step 12C, we connect the JMESPath app to it. Our JSON data field will be the #tc.api.result output variable from Step 12C. We will create one String expression with the value set to data.securityLabel. This will help to clean up the data for the future JSON.
Step 13D – Group API Data Parse
From the success of Step 12D, we connect the JMESPath app to it. Our JSON data field will be the #tc.api.result output variable from Step 12D. We will create one String expression with the value set to data.group. This will help to clean up the data for the future JSON.
Step 13E – IOC Assoications API Data Parse
From the success of Step 12E, we connect the JMESPath app to it. Our JSON data field will be the #tc.api.result output variable from Step 12E. We will create one String expression with the value set to data.indicator. This will help to clean up the data for the future JSON.
Step 14 – All API Calls into New JSON
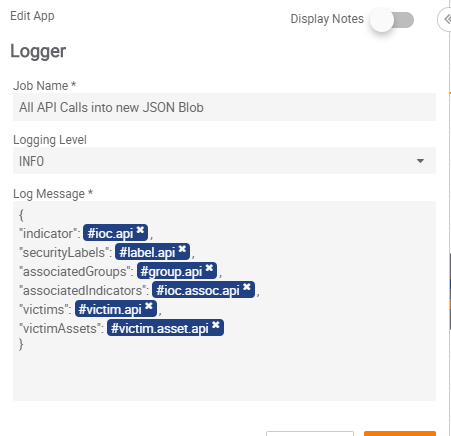
For Step 14, we will be using a Logger app. We will connect all five apps in Steps 13A-E to the Logger app. We will use Logger’s ability to modify the data to make a new JSON. The Log Message will be:
{
“indicator”: #ioc.api ,
“securityLabels”: #label.api ,
“associatedGroups”: #group.api ,
“associatedIndicators”: #ioc.assoc.api ,
“victims”: #victim.api ,
“victimAssets”: #victim.asset.api
}
The #ioc.api variable is the output variable from Step 5A.
The #label.api variable is the output variable from Step 13C.
The #group.api variable is the output variable from Step 13D.
The #ioc.assoc.api variable is the output variable from Step 13E.
The #victim.api variable is the output variable from Step 13A.
The #victim.asset.api variable is the output variable from Step 13B.
NOTE: Be mindful when creating this to remove the extra space that gets created when you insert in these variables.
Step 15 – Join Failure/Success
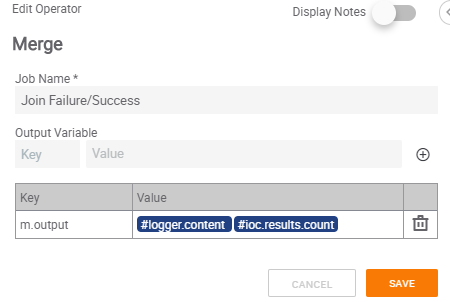
Now that the flow for both options on the IF/Else from Step 3 are complete, we can create a new Merge app. The Merge app will be connected to the Success of Step 4 and Step 14. We will use the variable merging option in Merge to ensure one variable is outputted regardless of the workflow. The Value for the key will be the #logger.content output variable from Step 14 and the output variable created in Step 4.
Step 16 – Component Trigger Output
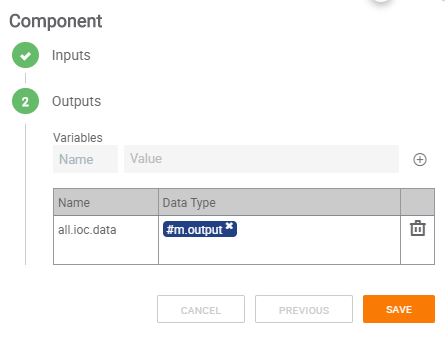
Now that all variables have been created, we can go back into the Component and set up the output variable for the Component. The Data Type for the variable will be the output variable from Merge in Step 15. This will provide the data collected in the Component as an output variable to be passed along to other apps within the larger Playbook.

