Posted
Welcome to ThreatConnect’s Playbook Fridays! We will continually publish posts featuring Playbooks (and sometimes Dashboards!) that can be built in the Platform.
ThreatConnect developed the Playbooks capability to help analysts automate time consuming and repetitive tasks so they can focus on what is most important. And in many cases, to ensure the analysis process can occur consistently and in real time, without human intervention.
In this edition of Playbook Fridays, we will be importing five (5) Playbooks that automatically import your RSS feeds into the ThreatConnect Platform, and tags any keywords related to the Covid-19 pandemic.
Additionally, you’ll learn how to utilize the following:
- DataStores – A Datastore in ThreatConnect is an object that is saved into ElasticSearch for long term persistence. With a datastore you have the flexibility to have the data saved, accessible to that playbook only or available to any playbook contained within your organization.
- RSS Feeds – RSS stands for Really Simple Syndication and it is a simple, standardized content distribution method. You can also harness the power of RSS to automatically import articles from cyber security blogs directly into your Threatconnect instance. This means that you can avoid the distractions of actually visiting the website, but still absorb the pertinent information.
Let’s briefly summarize the purpose of each of these Playbooks before we dive into their creation:
- Pull in your favorite RSS feed and saves the articles of your RSS request as individual ‘Events’ within ThreatConnect.
- Retrieve one of the previously created ‘Events’ webpage contents, and save that as a document within ThreatConnect. It will associate the webpage that was imported to the document for easy access.
- Define your keywords, and push them into the ThreatConnect Datastore. This allows you to save a JSON array to persistent storage on ThreatConnect so you can access it whenever you need. Please note that this Playbook only needs to be run once to populate the datastore (and any other time the list needs to be updated).
- Double check the contents of the Datastore within your ThreatConnect instance and outputs it on your screen. Because we are unable to directly interact with Datastores, this Playbook will look into the Datastore and return back what is stored within it to make sure that the third Playbook is working properly.
- Parse and tag the documents if the Playbook discovers the keywords we set in step 3 when we tag a document with the tag “parseme”. This last Playbook will do all the actual work of parsing and tagging your documents. Once we are certain that the Playbook is running correctly, we can change the trigger to run automatically, instead of by applying a tag.
How does this help me in the real world?
There may be times when your organization needs quick access to a persistent database of information that you want to use to quickly scan indicators or groups within ThreatConnect.
Save time by not having to read all imported content
This can help an organization save time by allowing an analyst to only focus their attention on pieces of data that have automatically been tagged with whatever keywords the organization is focusing on, saving the analyst from reading hundreds of thousands of documents and highlighting only the ones that need their focus.
To accomplish this, you will need to understand how to use a datastore within ThreatConnect. One of the benefits of understanding how to use a datastore is the ability to create playbooks that can save your analysts from having to read every single piece of information that comes into the platform. Because ThreatConnect can automatically read and tag every piece of information that comes into it, your team can then focus their limited time and attention to the information that matters.
An example use case is to create a persistent database of keywords related to the Covid-19 Pandemic that we can access from any playbook in our organization. Once the playbooks have been created, they can automatically parse any document that comes into the platform, and provide your analyst with a list of all relevant tagged Indicators or Groups that contain any of the Coronavirus keywords that we have selected in advance.
Let’s dive in and learn how to make this happen.
Requirements
- Access to the ThreatConnect instance and to the Knowledge Base (KB) site.
- Access to an RSS feed of your choice. Not sure how to find your RSS Feed? Look for the RSS icon on your favorite blog. It looks similar to this:

- Playbook Downloads & Videos
Playbook 1 – Import RSS Feed into ThreatConnect
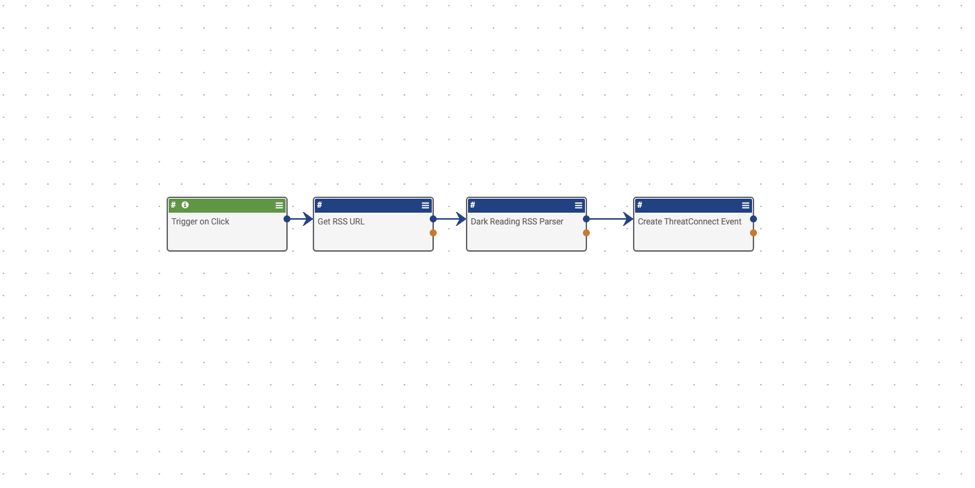
Trigger – HttpLink – Trigger on Click – Let’s start by looking at the trigger. You are temporarily using a trigger on click so that you can manually fire off the Playbook without having to wait for a timer to fire to get the RSS feed results. When you finally have this working correctly, you can simply change the trigger to a timer, and let it run automatically. Since the trigger on click doesn’t have any settings to adjust, go ahead and move on to the HTTP Client.
App – HTTP Client – Get RSS URL – This Playbook block will let the Playbook know where the RSS url is. Simply replace the existing URL for your favorite RSS url, then hit next twice and save the block.
App – RSS Parser – RSS Parser – Next step is to parse the RSS feed with the RSS Parse block. Here you need to make sure the XML content link reflects the content that the previous block is getting. You should not need to make any changes to this block.
App – Create ThreatConnect Event – Create ThreatConnect Event – Lastly, look at the Create ThreatConnect Event block. Here, you will need to make sure the Event name is pulling the parsed rss items. You should be able to leave this field alone. Next make sure that the owner of the data is properly selected. Then, dictate what RSS information is fed into Threatconnect by adding Attributes. Elect to pull the URL of the article, the description of the article (which should contain all the content), and lastly the author name. Then make sure that the Apply Attributes to All check box is NOT selected. This will add the links, descriptions, and authors for all the articles in each article, duplicating the information within the articles. To make it easier for you to automate later, you will also apply a Tag to this content. That tag can later be used as a trigger to run another Playbook creating a daisy chain effect.
Now that the Playbook is ready, go ahead and run it. Once you get the green status, you can now go into browse, select Events, and then see if all the articles have been imported successfully. Now you can change the trigger on this Playbook from an on-click trigger to a timer trigger that runs on a regular basis.
Playbook 2 – Attaching a copy of the web page to the events
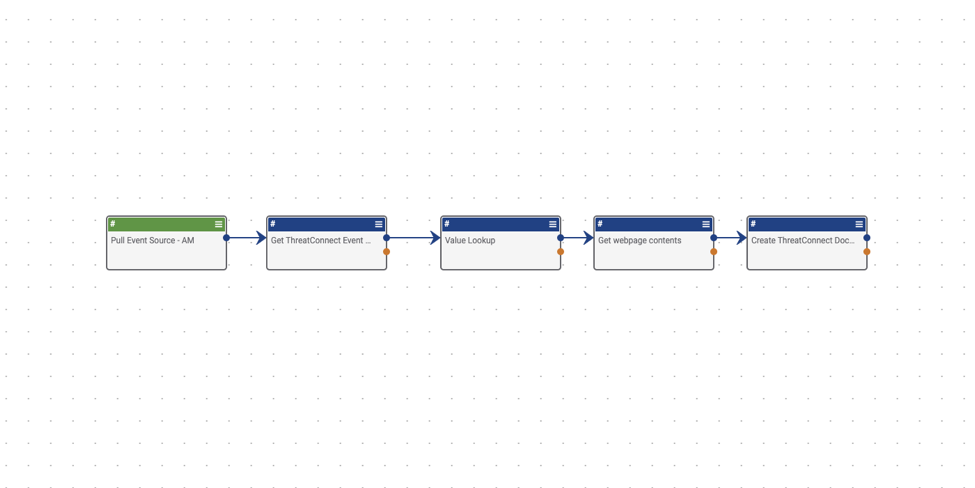
Trigger – UserAction – Pull Event Source – Once again, let’s take a look at the trigger. This trigger is a user action, which runs within the details page on your event group. This trigger will help you quickly test the Playbook, but later we can change the trigger to be automated, and run when an event item is tagged with a specific tag.
For now, use the UserAction trigger, and make sure that the Type is set to Event, so that the user action trigger is available for all events in your ThreatConnect org. Leave the response body blank.
App – Get ThreatConnect Event by ID – Get ThreatConnect Event by ID 1 – Next move on to the “Get ThreatConnect Event by ID” block. Since you will be deploying this Playbook manually on a specific event, you need to make sure that you pull in that event’s entity, which is Threatconnect’s object ID for this event. You should be able to leave this block alone, so go ahead and hit save.
App – Value Lookup – Value Lookup – Now, you need to tell the Playbook what you want to search for. In this specific case, search your triggered event for the source attribute that you imported earlier. That source is the URL that you imported earlier, and links directly to the webpage that is associated with this event. To pull the list of attributes from your event, you need to make sure that Source List of values is set to #tc.event.attributes to pull that list from your event. Then, assign it a new key of vl.Source. You should not need to edit this block, so let’s move onto the next one.
App – HTTP Client – Get webpage contents – Next, use the new vl.Source to direct the Playbook to get a copy of the web page. Do that within the HTTP Client block. You need to make sure that the URL is pointing to vl.Source using GET. Do not need to fill out any other setting in this block, so move on to the last one.
App – Create ThreatConnect Document – Create ThreatConnect Document 1 – The last Playbook block will fetch the webpage within the event source, and add it to Threatconnect as a document, and then link it back to the event so you can view the web page without having to leave ThreatConnect. ThreatConnect will create a local copy of the webpage, and automatically associate it with the event that we initially triggered it on.
There are different options available here. Start with Document Name. Since you are triggering it from an existing event, by choosing #tc.event.name we are referring back to the second block on the Playbook and assigning the document the same name as the event. Next the file name will be the same, but by adding .html, you are telling ThreatConnect that you want to save it as an HTML file. And lastly, you need the content of the webpage, which will be pulled from the fourth block as #http.content within the Document Data field. This fills the document with the code from the web page that was listed as the source of the event. Next you need to make sure that you once again select the correct owner. And lastly, so that the document is associated with the event, you need to make sure to add #trg.action.entity to Associate to which once again calls the object ID for the event and associates the document with that event.
Now run the Playbook to see if it works. To run it, make your way to Browse, then find an event that you want to download to the platform. Go into the details page, and then Playbook Actions. From there simply hit play, and wait a few moments. You can double check the status of the playbook, then simply refresh the event to see if it has any documents associated with it.
Playbook 3 – Populate your Datastore with your custom keywords
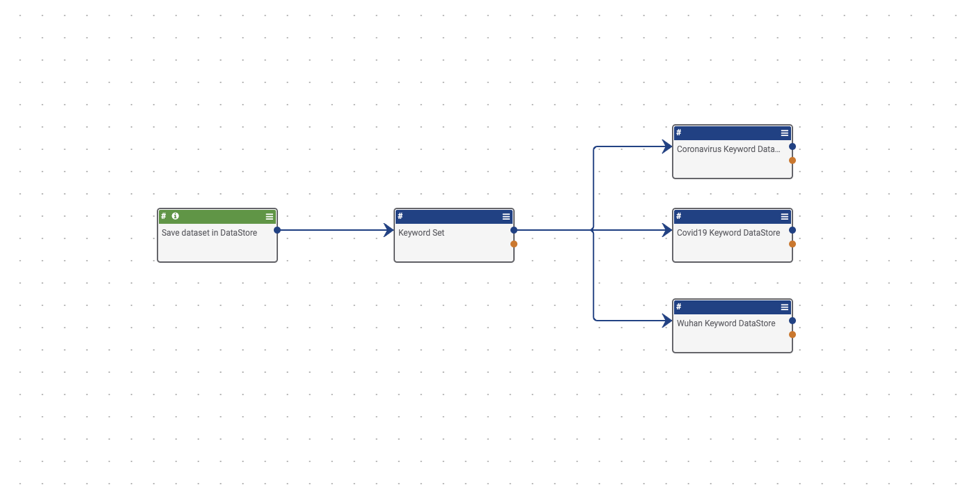
Before you get started, it’s important that you understand what a Datastore is. A Datastore in ThreatConnect is an object that is saved into ElasticSearch for long term persistence. With a datastore you have the flexibility to have the data saved, accessible to that Playbook only or available to any Playbook contained within your org.
Trigger – HttpLink – Save dataset in DataStore – Let’s start by looking at your trigger. Because the goal with this Playbook is to push keywords into your data store to be used later, you only need to run this Playbook when you have new keywords to add to the data store. Because of that, you only need to use the HttpLink trigger. You do not need to do anything else to this block, so move onto the next one.
App – Set Variable – Keyword Set – Next, take a look at your keyword set. Using the Set Variable block, you are going to create a series of key value arrays that you can call upon later to parse out keywords within the document, and tag it accordingly. You are creating several key value pairs, where the Key is the name of the keyword type, and the value is the JSON string array. That string array will later do the heavy lifting for scanning web documents. If you wish to add your own keywords here, simply follow the formatting here.
App – DataStore – Coronavirus Keyword DataStore – And lastly, now that you have specified your sets of keywords, send each set of keywords into your datastore. You accomplish this by using the DataStore app to send each set of keywords into a datastore. Look at the settings for this block. The most important part of this block is the Entity. The entity is the key that you created for each set of keywords. In this case, #Coronavirus. Then, you need to make sure that the Method selected is POST so that it pushes that string array into the datastore. Next, choose who will have access to this datastore, this Playbook only, or your entire organization. In this case, you want the entire organization to have access so that your next Playbook can access it as well. To accomplish this select Organization under Domain. Next is the owner, which you should be familiar with by now. The last setting, Store Name, is very important. Here you will designate the name of the Datastore that you want to create to hold these string arrays. In this case, since you’re using the same Datastore for all three sets of keywords, choose a generic name. This store name will be used across all of our keyword sets.
Now, run this Playbook. While you should get a green status on the Playbook, you won’t be able to know if it worked, until you look at the next Playbook.
Playbook 4 – Verify that DataStore contains the keywords
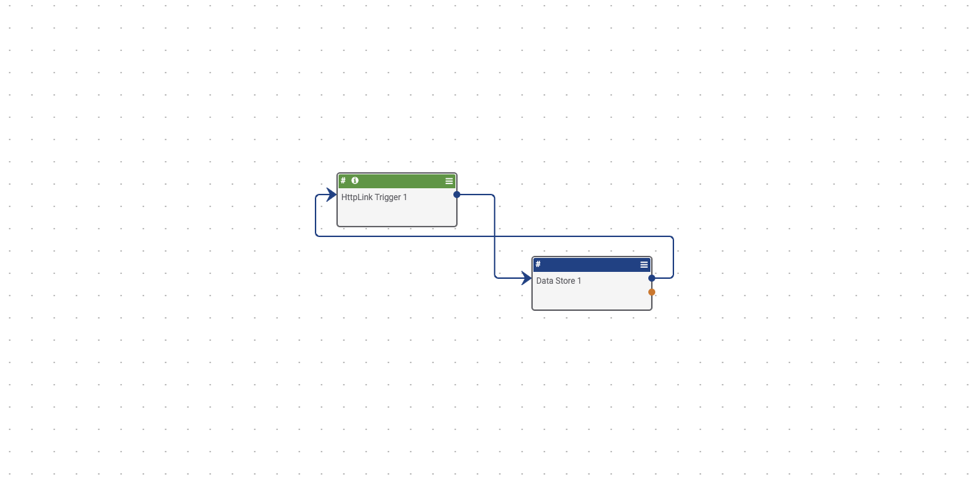
This next Playbook is quite simple, but very useful. There is no manual way to peek into a Datastore to see what is inside, so it’s best to create a simple Playbook like this that will go into the datastore for you, and pull out the stored keywords or whatever information you decide to store there.
Trigger – HttpLink – Trigger to pull data from Datastore – Begin by looking at the trigger. Here you have an HttpLink app that will trigger when you click on the unique playbook url. Now work your way down to the Response Body. Here you can choose what to display when the trigger url is clicked. Here you want to show the contents of our datastore, so in the Body field make sure that it says #datastore.response.
App – DataStore – Data Store lookup – Now, look at the DataStore app. You will notice that the Entity field contains { “from” : 0, “size”: 5000}, The from parameter defines the offset from the first result you want to fetch. The size parameter allows you to configure the maximum amount of hits to be returned. In this case, you are going to limit the maximum amount of hits to 5000. Next make sure that Method is set to Get, as we are trying to retrieve the results. The Domain needs to be set to Organization since the datastore we posted to is not on this Playbook. Next you need to make sure that the owner has been correctly chosen. And lastly, the Store Name must match the Store Name on the previous playbook to ensure that the playbook retrieves the correct datastore. Finally hit save.
Now it is time to trigger your Playbook.
Playbook 5 – Check your document for your keywords and tag them
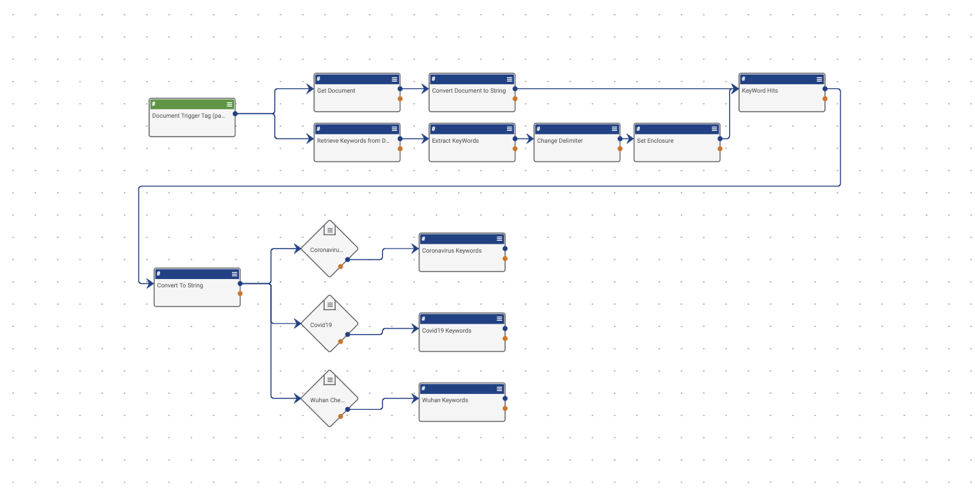
You have finally reached the final Playbook! This Playbook actually does all the work of sifting through your RSS feed, and actually doing the tagging. Let’s take a look and see how it works.
Trigger – Document – Document Trigger Tag (parseme) – Begin with your trigger. Use the Document trigger, which is fired when an action is taken on a document. Once you hit next, you can see that you need to choose the Owners of the Documents, as well as what Action Type needs to happen to trigger this Playbook. In this case, choose Tag Applied. Now, to avoid firing every time a tag is applied to a document, hit next, and further define our filters. Under Add Filters (up to 5) make sure Tag is selected, then below the Tag setting select Contains. Then make sure the word ‘parseme’ or any tag you want is typed out next to contains. Then hit save.
App – Get ThreatConnect Document – Get Document – Next, look at the Get ThreatConnect Document app. Here you need to let the Playbook know that you need to get the Document ID of the documents that were tagged with ‘parseme’. To do that, simply make sure that the Document ID field shows #trg.tc.entity. This will pull the entity from the trigger.
App – Binary To String – Convert Document to String – The next step is to convert the contents of the document you tagged to a String from a Binary so that you can run your string array from persistent storage against it. To accomplish this use the Binary To String app. Here you simply need to make sure that the Document ID is being referenced in the Content field. It should read as #tc.document.entity just like the previous app.
App – DataStore – Retrieve Keywords from DataStore – Now, let’s take a step back, and check out the ‘Retrieve Keywords from DataStore’ app. This app should look familiar from its use in the third and fourth playbooks. We again need to maintain our elastic search limit by placing { “from” : 0, “size”: 5000} in the Entity field. Under Method we need to make sure we have selected GET since we will be retrieving from the DataStore. Next, we need to make sure that the Domain is set to Organization since the DataStore was originally stored under organization, and is not located in this playbook. Next we need to make sure that the Owner is set to the same owner as your previous playbooks. Lastly and most importantly, you need to make sure that your Store Name is the same as in the previous playbooks. This setting tells the playbook which Datastore needs to be retrieved. Once you have confirmed those fields are correct, feel free to save.
App – Json Path – Extract KeyWords – Now that we have called on our DataStore, we need to extract the different sets of keywords to allow us to take actions based on successfully finding them in a document. To extract, we will be using the Json Path app. Under Json Content, we need to call on the contents of our DataStore. We do this using #datastore.response, as a string. Next, we need to prepare each of our keyword sets to make it easier to call each one individually. That means we need to create 3 String Array Expressions, one for each keyword set. For the key, I’m going to define the Coronavirus keywords as Coronavirus_Keywords. For the value I am going to use the following expression: $..data[*].Coronavirus.[*] which will call the set of keywords for Coronavirus. I am going to do this for all the keyword sets, being careful to note that it is case sensitive. Once all the expressions have been added, we can move forward to the next app.
App – Join Array – Change Delimiter – Now, we need to change our delimiter from commas to vertical bars. To do this, we will use the Join Array app. When we select the Change Delimiter app, you can see right away that the first field Join Delimiter has the vertical bar character already there. The app will find all of our commas, and replace them with that vertical bar. To do this for all the keywords, we need to add all of our keyword sets to the Variable Mapping field. As you can see, we are using the following format for our keys: join.Keywordsetname and the value as your variables from the JSON Path App we just configured. Once you have added all your keyword sets, hit the save button.
App – Set Variable – Set Enclosure – Next, we need to set enclosures on our keyword sets so they are properly formatted. We are once again using the Set Variable app to accomplish this. Here we are formatting our key as enclosure.Keywordset. Replace Keywordset with your own keyword sets here. Then, for Value we need to add our previous output from the Change Delimiter block along with brackets at the beginning and end. It should look something like this: (#join.Coronavirus). Make sure you do this to all of your keyword sets. Once that’s complete hit the save button.
App – Regex Extract – KeyWord Hits – Now that our keyword sets are correctly formatted, we can now use Regex to extract the keyword from the document. To do this we will be calling the document string that we created earlier and running it against the expression contained in the Datastores that we have now formatted to work within Regex. The first field we need to check is the Input field. Here we need to make sure that it reads as #b2s.text, which calls our converted document. Next, we need to map each of our enclosed keywords. That means our Key will be formatted as: regex.Keywordset and our Value will call for the previously enclosed keyword sets using #enclosure.Coronavirus. Once you have all your keywords properly defined, select the save button.
App – Join Array – Convert To String – We have one last task to accomplish to get our keywords ready. In the previous app, our outputs were String Arrays, but our operators need strings to be able to work correctly. To accomplish this, we will be utilizing the Join Array app, which will output our keywords as a string. The first field we need to double check is our Join Delimiter field, and ensure that we have a comma in that field. Next, we need to make sure that we call each of the previous keyword sets. To accomplish this, we will set our Key to the name of the keyword set. In this case, we are using Coronavirus. And for the value, we will call our previous apps outputs, in this case #regex.Coronavirus. We will make sure to do that for all our keyword sets then hit save on our app.
Operator – If / Else – Coronavirus Check – Now that we have our keywords converted to strings, we can now feed them into our operator. However, because it was converted into a string, we will need to create separate operators for each keyword set. Let’s set up the first operator. The first field we need to look at is First Operand. There we need to call the first keyword set string, in this case #Coronavirus. Next, we want it to fail if it does not contain the keyword, so for Operator, we need to make sure we select ‘does not contain’ and for Second Operand we need to make sure it reads ‘null’. Don’t forget to repeat this step for each keyword set.
App – Create ThreatConnect Tag – Coronavirus Tag – We are almost there! In our final app, we need to make sure that the Document that we want tagged is declared and tagged. We accomplish that by using the Create ThreatConnect Tag app. The first field we need filled out is the Object. Here we will call the Object ID by using #trg.tc.entity. Then, to apply the tags that have been found in our document, we will call our regex expression under Tag. In this one we will put #regex.Coronavirus. Now we need to do that for each of our additional keyword sets. Now that it is complete, we can test it by tagging a document with the tag ‘parseme’.
Convert your Playbooks to run automatically instead of manually
Ready to make it automatic?
To make this Playbook automatic, you’ll need to change a few triggers.
- Playbook 1 – Change your trigger from trigger on click, to a timer trigger.
- Playbook 2 – Change your trigger from useraction to ‘Document Create Trigger”.
- Playbook 3 – No change needed unless your keyword sets change
- Playbook 4 – Only used to check keyword sets
- Playbook 5 – Change trigger action type from Tag Applied to Create
- Dashboard – If you really want to make your life easier, you can create a dashboard that automatically pulls your tagged items into one dashboard card.
Don’t want to create the Playbooks by yourself? Download all the Playbooks and import them into your ThreatConnect instance here.
Good luck!