Posted
To code or not to code? That is the question that many security teams grapple with when attempting to solve a specific problem or introduce a new capability. While TIP and SOAR platforms like ThreatConnect offer many out of the box applications and integrations to support threat intelligence and security operations teams, there may come a time when new logic or a custom integration is required.
ThreatConnect empowers security teams to solve their own unique challenges offering both code and low-code development environments and frameworks. In this blog, I’ll provide a high-level overview of the coded option with ThreatConnect TcEx App Framework and summarize my experience in setting up a tcex development start to finish in case you want to give it a try.
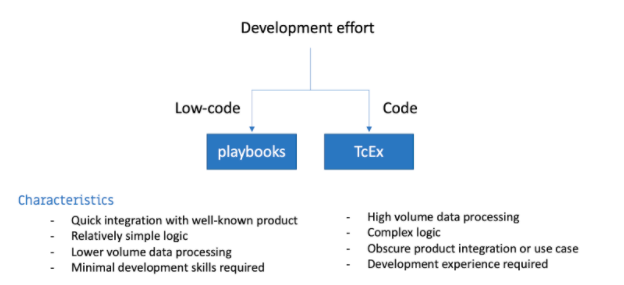
No Code is probably my favorite Pearl Jam album; it’s also everyone’s favorite method for quickly delivering capabilities as it implies you drag and drop a set of programmatic logic blocks around on a digital canvas and build a program – something so simple that there is no code involved. Unfortunately, that is still somewhat of a pipedream.
In some cases you can do that with ThreatConnect’s Playbooks when the logic required is truly minimal. However, in most cases, one quickly needs to come up with gnarly logic and/or manipulate data that require programming experience or mindset. Even if you’re not writing Python code per se, I tend to label using playbooks a low-code option. And as I’ll discuss later, you may have a need to develop your own playbook app that can be reused by others in a more plug-and-play fashion.
App Use Cases
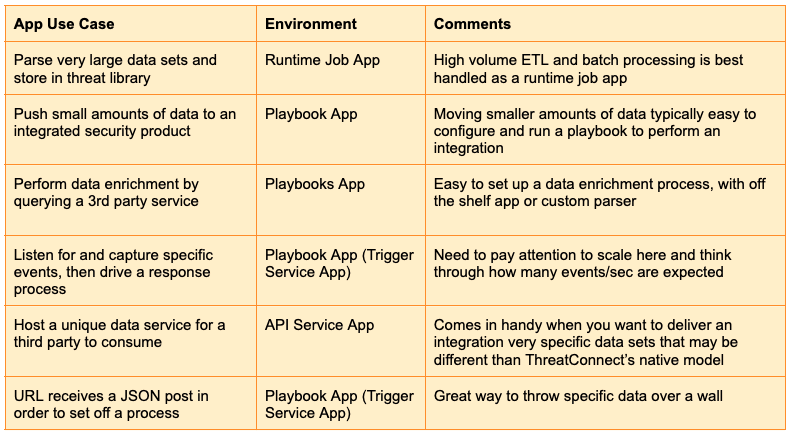
Once you realize you must develop an app, the use case will typically drive the decision of which type of app to write and where to run it.
There are 3 main App types to choose from in the ThreatConnect universe.
- Runtime Job Apps – These run as a background job within an organization, typically on a schedule.
- Playbook Apps – These run within the playbook environment and will be used in conjunction with hundreds of other Apps. Trigger Service Apps, which drive a process based upon some ‘trigger’ are a unique type of Playbook App.
- API Service Apps – These apps can be helpful when you want to create your own custom API for servicing other systems with the unique logic and data you create.
Let’s look at a few use cases and see when you’d use one app type over another.
There are substantial advantages for developers to run apps inside the platform versus outside such as simplified token-based authentication, system monitoring and resources, and in-band lifecycle management with other apps and that is what a majority of our customers do today. However, customers are able to use TcEx to run code externally as well, and an External App template is provided to facilitate that.
One more thing to mention before we dig into an example of building a Job App.
ThreatConnect App Builder is a simple and convenient code editor that is integrated within the platform which is useful for writing applications or making changes to existing code. However, some developers may want the full power of their own IDE environment to develop applications with preferred development tools.
For the remainder of this blog, I will walk through the steps I took to set up Visual Studio Code and TcEx to build a ‘Hello World’ app based on the Job App template. I’d encourage you to try the same if you are interested in developing apps on the TC platform.
A TcEx 3.0 ‘Hello World’ Example From Start to Finish
For the most part I followed the instructions here, but needed to hash out the prerequisites since those aren’t covered in the guide. So bookmark it and keep it in another tab during the process.I use a MacBook Pro, so I’ll be basing this tutorial on it. However, there shouldn’t be much of a difference if you use Windows.
First item, confirm that you have Xcode installed. It is required for Python, homebrew and other software. I’m sure only certain elements of it are actually required, but I went for the full install. You’ll definitely need administrative permissions to change software on your machine.
Open a command prompt, and type
$ xcode-select --install
Next, install the Homebrew package manager using this helpful BASH script.
- DISCLAIMER: ThreatConnect doesn’t own or control the software referenced in the installation script so please be diligent by reviewing the code and use at your own risk.
/bin/bash -c 2"$(curl -fsSL
https://raw.githubusercontent.com/Homebrew/install/master/install.sh)"
Once completed, verify things are installed correctly.
$ which brew
/usr/local/bin/brew
$ brew -v
Homebrew 3.3.13
Homebrew/homebrew-core (git revision 9ccc327241b; last commit 2022-02-03)
Next, a good number of libraries are required. Install them using Brew.
brew install bash-completion2 bzip2 gdbm git git-lfs
2golang jmespath/jmespath/jp jq libmagic lsd lnav ncurses nvim
3nvm openssl pyenv pyenv-virtualenv readline redis
4rsync sqlite tmux tree unison vim wget xonsh xz zlib
When it comes to Python, everyone has their preferences. I’ve discovered the easiest way to manage multiple versions, with their own unique apps and libraries, is using virtual environments, pyenv. To install, use the following command.
$ brew install pyenv
Then confirm that it was installed correctly.
$ pyenv --version
pyenv 2.2.4
- IMPORTANT: Note that you must select a Python version that will be compatible with the Python version supported on your instance of ThreatConnect. Ask your administrator to confirm the Python version and try to match it, or revert back to older versions as some backwards compatibility is supported.
The instance I’m testing on runs Python 3.6.15, so I installed that version using pyenv.
pyenv install 3.6.15
I had an issue involving my .bash_profile file loading the path of another Python version on my machine (MacOS has a default Python version installed as well). So to avoid confusion, make sure you know which versions are referenced in your shell and make sure that you set up your .bash_profile to reference the pyenv path. One of the engineers on our team recommended the following snippet and it works like a charm.
export PYENV_ROOT="$HOME/.pyenv"
export PATH="$PYENV_ROOT/bin:$PATH"
if hash pyenv > /dev/null 2>&1; then
    export PYENV_VIRTUALENV_DISABLE_PROMPT=1
    eval "$(pyenv init --path)"
    eval "$(pyenv init -)"
    eval "$(pyenv virtualenv-init -)"
fi
# .bash_profile
# Get the aliases and functions
if [ -f ~/.bashrc ]; then
        . ~/.bashrc
fi
Next, we’ll create a virtual Python environment based on the version installed. As stated previously, this version should reflect the Python version running on your instance of ThreatConnect.
$ pyenv virtualenv -p python3.6 3.6.15 app-3.6.15
The result of this command produces a virtual environment, app-3.6.15, that I’ll use in building the TcEx app. The cool thing is I can create another virtual environment, say integration-3.6.15 and load particular libraries for that integration, keeping code bases separate within VS Code, the IDE I use in this tutorial.
Next, activate it.
$ pyenv activate app-3.6.15
I’m a newbie to VS Code, but love it so far. Of course you can use your preferred IDE for this tutorial and development work, but I’ll explain how I set things up with VS Code.
Download and install it, then take a look at this article to give you some background on using Python environments in VS Code, at least bookmark it as a reference should you run into issues. Next, install the Python Extension for VS code.
At this point, we have the IDE setup and a virtual Python environment ready to use. We are ready to create our app environment and install TcEx and its dependencies.
VS Code uses directories to organize code, so in whichever folder you store code create a folder called tcex-hello-world.
$ mkdir tcex-hello-world
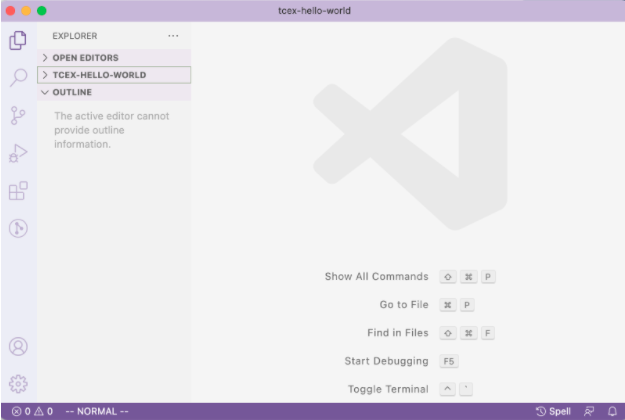
Next, run VS Code and open the folder you just created. You should see something like this:
Next, open a terminal within VS Code. We’re going to load our Python environment and begin to install other libraries accessing it through the shell.
$ pyenv shell app-3.6.15
Confirm within the shell that you get the 3.6.15 version of Python expected. You can also set that version locally and globally using the local or global flag, respectively.
$ python
Python 3.6.15 (main, Feb 20 2022, 13:23:30)
>>>
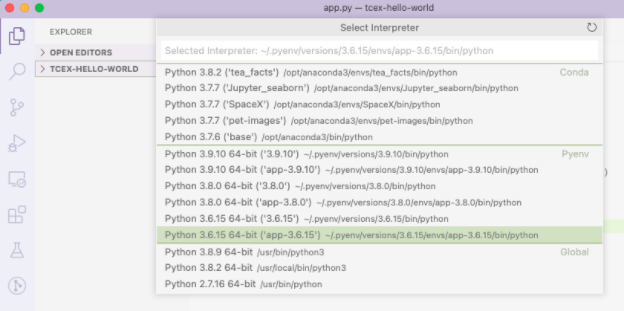
Open the Command Palette (under View) to confirm you see the virtual environment you just created. This is also where you can see all of the other versions of Python available for selection. If you don’t see the pyenv environment that you are going to use for your project, then you may need to enter the interpreter path manually.
The TcEx App Framework provides commonly used classes and methods for writing Apps. The Framework is intended to speed up the development process and ensure that Apps contain the core functionality required.
$ pip install tcex
That command will download and install TcEx packages and the client tool (CLI).
The TcEx CLI tool has a companion project that includes templates for different types of Exchange Apps to support different use cases. To get a sense of the options you have with TcEx, type
$ tcex —-help
ThreatConnect makes it easy to set up an App through the use of templates. Here is a quick summary of the templates available.
$ tcex list


Installation Summary
====================
Template Type       : playbook
Template Name       : utility
Files Downloaded    : 15
Branch              : main

Organization Templates
======================
Template            : basic
Contributor         : ThreatConnect
Summary             : A template that provides the structure for a Job App without any App logic.
Install Command     : tcex init --type organization --template basic


Template            : ingress
Contributor         : ThreatConnect
Summary             : A template of a working ingress Organization App.
Install Command     : tcex init --type organization --template ingress


Playbook Templates
==================
Template            : actions
Contributor         : ThreatConnect
Summary             : A template of a working Playbook Action App.
Install Command     : tcex init --type playbook --template actions


Template            : basic
Contributor         : ThreatConnect
Summary             : A template that provides the structure for a Playbook App without any App logic.
Install Command     : tcex init --type playbook --template basic


Template            : utility
Contributor         : ThreatConnect
Summary             : A template of a working Playbook Utility App.
Install Command     : tcex init --type playbook --template utility


Trigger Service Templates
=========================
Template            : basic
Contributor         : ThreatConnect
Summary             : A template of a working Custom Trigger App.
Install Command     : tcex init --type trigger_service --template basic


Webhook Trigger Service Templates
=================================
Template            : basic
Contributor         : ThreatConnect
Summary             : A template of a working WebHook Trigger App.
Install Command     : tcex init --type webhook_trigger_service --template basic
These templates leverage the framework and make it simple for developers to implement their logic without needing to worry about all of the necessary files, configuration files, etc. Notice that these templates map to the use cases presented earlier.
In this tutorial, we’ll create a Hello World Job App that installs in the organization’s runtime environment and executes on a set timer. As mentioned in the intro, we typically use job apps to perform batch processing, such as performing ETL operations.
Next, grab the template and initialize it.
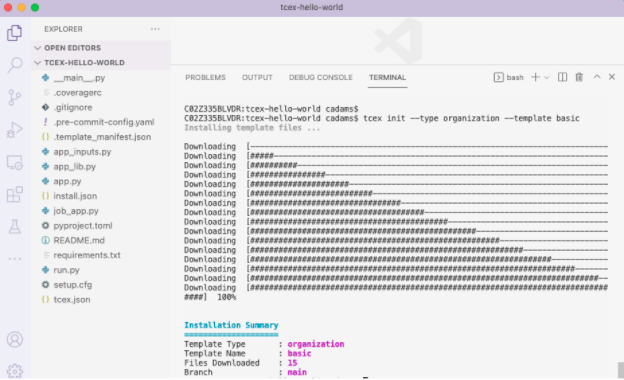
$ tcex init --type organization --template basic
Upon enter, you should see
Installing template files ...

Downloading  [################################################################################]  100%

Installation Summary
====================
Template Type       : organization
Template Name       : basic
Files Downloaded    : 15
Branch              : main
You’ll see roughly 15 files included in the package within the directory structure, a combination of Python files and configuration files that comprise the framework.
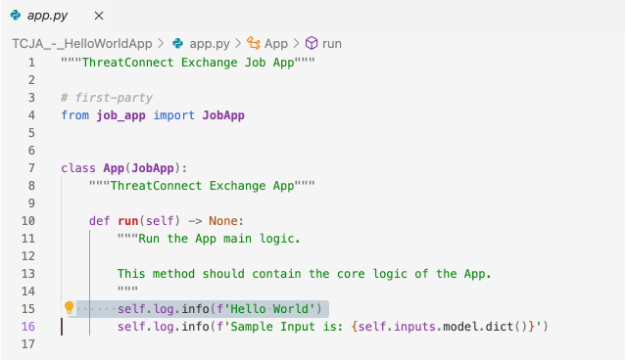
When using the basic template, the logic you’d like to introduce goes in the app.py file. Since this is just a simple hello world example, I’ll add one line of code to print to the log. See line 15 below.
Next, we need to load all of the dependencies prior to packaging, so enter the following command:
$ tcex deps
Lastly we package the code for installation in ThreatConnect.
$ tcex package
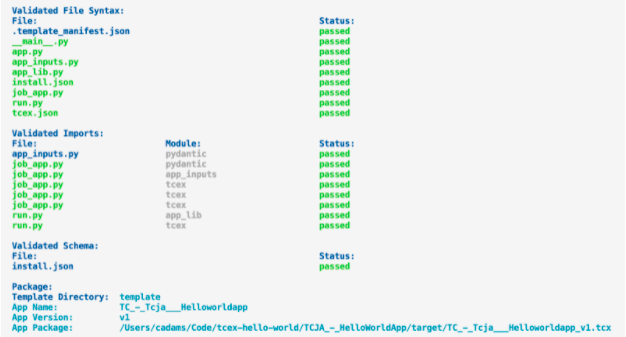
And there you have it, we’ve created a .tcx file that we are going to load within a ThreatConnect organization to execute.
Next, load it within the instance by going to the TC Exchange Settings page and clicking on the plus icon to add the file. The location of the file is presented in the App Package path shown in the terminal.
Once loaded you’ll see it appear in the list of apps now available on the instance; the app we just packaged is labeled Example Basic Organization App.

At this point the application is installed and available to use in any Organization, if you had selected that option during the install. Next, I created an API account that the app will use; you will need to select it when using the create job wizard.
Next, under Organization Settings, create a job that will notify me and send me the logs upon completion. You will be prompted to enter an API key, so go ahead and create one before the next step if you have not in the past. The job install wizard will give you the option to select any API key available in the org.

Now that the app is loaded, I can click the RUN button to execute the code. In the snippet below, you can see where ‘Hello World’ is written to the App log.
2022-02-28 13:24:59,143 - tcex - INFO - Hello World
Once you’ve gotten to this point, you are now ready to apply more sophisticated logic to develop your own apps using the ThreatConnect Exchange Framework! Hopefully this walkthrough was helpful in understanding how to stand up a development environment for ThreatConnect apps.
In a follow-up blog, I’ll go through the motions to create a feed ingestion app for custom indicator types using the input (or ingress) template.

